
Your motorcycle gear is your most important safety investment, and keeping it in good condition ensures it protects you when needed. Regular maintenance prevents wear and tear caused by sweat, UV exposure, and road grime, which can reduce the effectiveness of helmets, jackets, gloves, and boots. Here's a quick rundown of what you need to know:
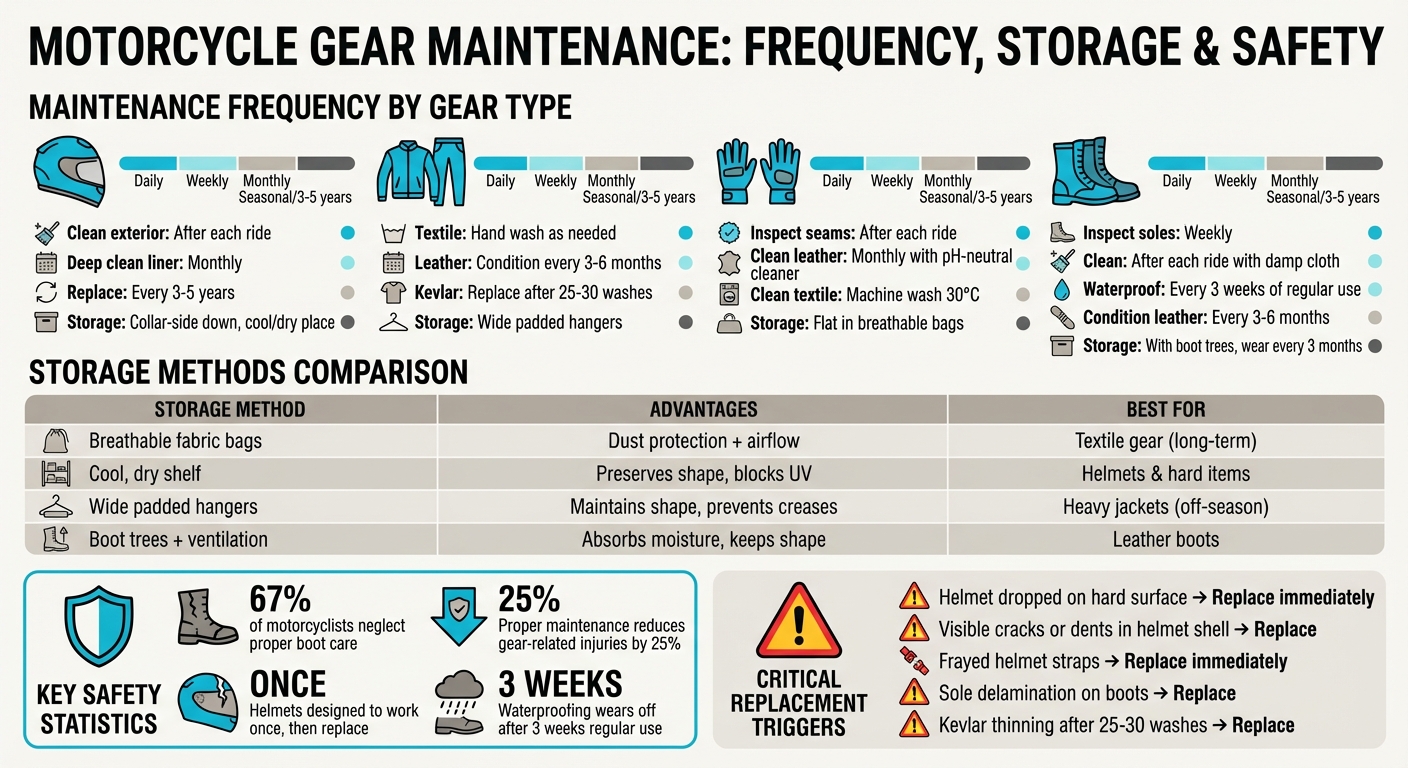
- Helmets: Clean with mild soap, inspect for cracks, and replace every 3–5 years. Store in a cool, dry place, collar-side down.
- Jackets and Pants: For textiles, hand wash with mild detergent; for leather, condition every 3–6 months. Always hang on padded hangers.
- Gloves: Check seams and closures after each ride. Clean leather with a pH-neutral cleaner and textile gloves in lukewarm water.
- Boots: Inspect soles for wear, clean with a damp cloth, and waterproof regularly. Store with boot trees to maintain shape.
- Storage: Keep all gear in a dry, ventilated space away from sunlight and moisture.
Neglecting maintenance can compromise your safety. Follow these tips to extend the lifespan of your gear and keep it reliable on every ride.
Motorcycle Gear Maintenance Schedule and Storage Methods Comparison
How to wash your motorcycle riding gear | Do's and Don'ts
sbb-itb-bfda696
Tools and Products You'll Need
Before diving into maintenance, make sure you have the right supplies on hand. Always opt for products specifically designed for motorcycle gear instead of generic cleaners to ensure the best care.
Cleaning Supplies
When it comes to helmets, stick to a mild soap for general cleaning. For the visor, try a specialised cleaner like Scott Anti Fog (NZ$9.95), and for the interior, Motul M2 Helmet Interior Clean (NZ$20.18) helps tackle odours effectively. For leather gear, use Motul M3 Perfect Leather (NZ$19.60) to keep it soft and prevent cracking.
If you’re maintaining textile jackets and pants, a technical wash like Sno Seal Sportwash is ideal, as it cleans without stripping waterproof coatings. Follow it up with a re-waterproofing treatment such as Gecko Guard to restore weather resistance. To aid cleaning, grab soft brushes like the Oxford Chain Cleaning Brush (NZ$10.90) and microfibre cloths for gentle application and polishing.
For all-around cleaning, Motomuck (starting at NZ$21.95) is a versatile option that works across different gear types. Conveniently, Moto 1 offers these products from their New Zealand warehouse, with free shipping on orders over NZ$149.
Once your gear is clean, storing it properly is just as important to maintain its performance.
Storage Items
Proper storage can extend the life of your gear. For helmets, use breathable helmet bags and always store them collar-side down to avoid stressing the retention systems. Jackets and one-piece suits should hang on sturdy hangers with large, rounded shoulder supports to maintain their shape and keep the armour in place. For riding pants, opt for waistband clip hangers to prevent creasing in protective panels.
Store everything in a warm, dry, and well-ventilated space. Avoid damp areas, as humidity can lead to mould and material degradation. If you travel frequently, consider investing in purpose-made motorcycle gear bags to protect your equipment from damage during transit.
Helmet Maintenance Checklist
Your helmet is your most critical piece of safety gear, and keeping it in excellent condition is essential. As OC1 explains:
The helmet is the only piece of motorcycling equipment that can save your life.
Here’s what you need to do to ensure it stays in peak condition.
Cleaning and Inspection
Start by cleaning the exterior shell with mild soap, water, and a soft microfibre cloth. For stubborn insect debris, lay a wet towel over the affected area for 1–2 hours to soften it up. Removable liners can be hand-washed in lukewarm water with a mild detergent or machine-washed at 30°C in a mesh bag. For fixed liners, simply wipe them down with a damp cloth and a neutral cleaner. Always air-dry your helmet - using hair dryers or radiators can damage the EPS impact-absorbing layer.
While cleaning, inspect the shell for cracks or dents, check the EPS foam for signs of indentation or separation, and examine the chin strap for any fraying. Helmets typically last 3 to 5 years, as exposure to sunlight, heat, and sweat gradually weakens the materials. Ride Forever makes an important point:
The tough truth about helmets is they are designed to work once, then be thrown away.
If your helmet has been dropped onto a hard surface, replace it immediately - even if there’s no visible damage. Once your helmet is clean and inspected, don’t forget to look after the visor.
Visor and Anti-Fog Care
A clean visor is essential for clear vision. Use a specialised cleaner and a microfibre cloth to clean it regularly. If your helmet has a Pinlock anti-fog insert, remove it before cleaning and make sure both the visor and insert are completely dry before reassembling. This helps prevent internal fogging. For compacted dirt in air vents, use a soft toothbrush or cotton swab to gently clean the area.
Additionally, check visor mounting screws weekly to ensure they’re secure, and inspect D-rings for any signs of roughness or cracks.
Helmet Storage
Proper storage can extend your helmet’s lifespan. Place it collar-side down on a flat shelf in a cool, dry, and sun-free environment. UV rays can degrade both the shell and the internal foam over time. Use a breathable helmet bag to shield it from dust and scratches.
Avoid hanging your helmet by the chin strap, as this can strain the retention system. Also, don’t store gloves inside the helmet - dirt and leather chemicals can harm the inner liner. Finally, keep your helmet away from fuel vapours and other chemicals, as they can compromise its protective materials.
Gloves Maintenance Checklist
Your gloves endure a lot during every ride, so taking care of them regularly is essential to keep them protective and comfortable. Whether you prefer leather or textile gloves, proper maintenance not only extends their lifespan but also ensures they perform reliably when you need them.
Inspecting for Wear and Damage
After each ride, give your gloves a thorough once-over. Pay close attention to the seams - any loose stitching or separation can compromise their protective qualities. Examine the palms and fingers for signs of thinning, fraying, or fuzzing. For gloves with protective padding or hard armour, make sure these elements remain securely attached. Leather gloves require extra care; check for stiffness, drying, or cracking. With textile gloves, watch for any signs of fabric deterioration. Don’t forget the closures - clean Velcro to remove lint and threads, and lubricate zippers to keep them functioning smoothly.
As Team Reise Moto recommends:
Regularly clean and lubricate zippers to prevent them from sticking. Velcro should be kept free from lint and threads to maintain its grip.
Once the inspection is done, move on to cleaning to maintain the gloves' overall integrity.
Cleaning and Conditioning
Leather and textile gloves need different cleaning methods. For leather gloves, avoid soaking them, as this strips away their natural oils. Instead, use a pH-neutral leather cleaner applied to a soft microfibre cloth. Gently wipe the surface in circular motions. Drying leather gloves takes time - usually 48 to 72 hours at room temperature. To help them retain their shape, use paper towels to absorb excess moisture. Once dry, apply a leather conditioner or natural oils like lanolin monthly to keep the leather soft and flexible.
Textile gloves are generally easier to clean. Many can be machine-washed on a gentle cycle at 30°C. To combat interior odours, sprinkle a bit of baking soda or cornstarch inside, or use a specialised anti-odour spray. Avoid direct heat sources like radiators or hairdryers, as these can damage both leather and textile materials by causing shrinkage or hardening.
Drying and Storage
Let your gloves air-dry naturally in a well-ventilated area, away from direct sunlight or heat. For textile gloves, hanging them by the cuffs works well. Leather gloves, however, should be laid flat or hung by the fingertips to avoid stretching. When they’re slightly damp, wearing them briefly and clenching your fist can help them keep their shape.
For storage, keep your gloves flat in a cool, dry place. Opt for breathable fabric bags instead of plastic ones to prevent mould. As Five Gloves advises:
Lay them out carefully on a shelf in a dry room, without deforming them, and place them above the rest of your equipment, rather than below it.
If you own multiple pairs, rotate between them. This allows each pair to dry completely between rides, ensuring they remain in top condition and ready to protect you on the road.
Jacket and Protective Gear Maintenance Checklist
Just like your helmet and gloves, your motorcycle jacket needs regular care to stay in top shape. Whether it's leather or textile, proper maintenance ensures your gear remains ready to protect you when it matters most. As Ride Forever wisely says:
Money spent on good gear is never wasted, but you've got to look after it. Care for your gear and it will continue to look after you.
Inspecting Armour and Closures
Start by removing the armour inserts to check both the protectors and their pockets. Look closely at shoulder, elbow, and back protectors for any cracks or damage - hard foam armour should remain intact, free of crushing or splits. Pay extra attention to high-impact areas, checking for thinning, abrasions, or wear. Examine closures like zippers, snaps, and Velcro to ensure they still work properly and aren't rusting. If your gear includes Kevlar lining, keep in mind that it begins to thin after 25–30 washes, so you’ll eventually need to replace it. For waterproof jackets, test the surface: water should bead up. If it doesn’t and instead soaks in, it’s time to reapply the DWR coating. After inspection, move on to cleaning and conditioning.
Cleaning and Conditioning
For textile jackets, hand wash in lukewarm water with a mild detergent. Close all zippers and Velcro first, and skip harsh products like bleach or fabric softeners. Rinse thoroughly to maintain waterproofing.
Leather jackets require gentler care - never machine wash or soak them. Use a damp microfibre cloth with a pH-neutral cleaner to gently remove dirt. To keep the leather supple and crack-free, condition it every three to six months. Apply a small amount of conditioner in circular motions, allow it to soak in, and buff off any excess. Always test on a small area first. Regular riders should aim for a deep clean every three to six months, while occasional riders can do this once a year.
Storing Protective Gear
Proper storage is crucial for maintaining your gear's performance. After every ride, air out your jacket to prevent odours and interior damage. Once it’s clean and completely dry, hang it on a wide, padded hanger to preserve its shape. Store it in a cool, dry spot using a breathable garment bag - avoid sealed plastic bags, as they can trap moisture and lead to mould. As Andre Silva highlights:
The right way to store motorcycle clothing starts with one non-negotiable step: always clean and fully dry gear before putting it away.
For extra freshness, consider cedar blocks or activated charcoal instead of mothballs. Before reinserting the armour, double-check that the jacket is completely dry and that all protectors are securely positioned in their pockets.
Boots Maintenance Checklist
Your motorcycle boots endure a lot every time you ride, making regular upkeep essential for keeping them protective and comfortable. Surprisingly, a 2023 survey revealed that over 67% of motorcyclists neglect proper boot care, which not only compromises safety but also shortens the lifespan of their gear. On the flip side, proper maintenance can lower gear-related injuries by up to 25%. Start by inspecting the soles and uppers to catch early signs of wear before they become bigger issues.
Inspecting Soles and Uppers
Begin by examining the soles. Check the tread for wear and look for delamination - this is when the sole starts to separate from the upper. If your boots feature PU (polyurethane) midsoles, keep an eye out for hydrolysis, a natural breakdown that occurs when boots sit unused for extended periods. Pay extra attention to high-stress areas, like the forefoot, for loose or frayed stitching. As LOWA notes:
If the leather gets too dry and is not properly hydrated, the flex-point at the front of the boot will take on a 'boardy' feel. This means the leather will start losing its flexibility and eventually crack.
Test zippers to ensure they glide smoothly and inspect the leather around them for cracks or wear. Look closely for dehydration signs in the leather, such as small cracks, and check metal eyelets for rust. Examine rubber rands (the protective layer around the base) for signs of heat or UV damage. Don’t forget to remove the insoles to inspect the interior lining for wear, moisture issues, or mould.
Cleaning and Waterproofing
Start by removing laces and insoles. Clean the exterior with a damp cloth and a neutral, alcohol-free cleaner, or use specialised leather soap. For the interior lining, use mild soap and wipe it down before air-drying. A soft-bristle brush is great for getting rid of dirt and mud on the surface. If you notice white salt marks, clean them immediately with a vinegar and water solution - salt can cause leather to deteriorate quickly and leave permanent stains.
Once your boots are clean and dry, apply a leather conditioner to keep the material soft and flexible, especially in high-stress areas like the forefoot flex zone. After conditioning, apply a waterproofing spray or wax-based product to protect against water damage. Keep in mind that waterproofing wears off after roughly three weeks of regular use, so reapply as needed. Never dry your boots near a radiator or in direct sunlight - temperatures above 50°C can damage the toe box and make the leather brittle.
Boot Storage
Store your boots in a cool, dry, and well-ventilated space. Use boot trees or stuff them with newspaper to help maintain their shape, and opt for breathable fabric bags for off-season storage. To prevent PU midsoles from breaking down due to hydrolysis, wear your boots at least once every three months - even a quick walk around the block will suffice. Before storing them for an extended period, ensure they are thoroughly cleaned, conditioned, and waterproofed to keep the leather in good condition and ready for your next ride.
Storage and Seasonal Care Checklist
Taking care of your gear during storage isn't just about tidiness - it’s about extending its life. Store your items in a cool, dry, and well-ventilated space, keeping humidity below 50% to prevent mould and mildew. A hygrometer can help you monitor moisture levels, and adding silica gel packets or moisture-absorbing crystals can further protect your gear. Avoid direct sunlight, as UV rays can fade colours and degrade materials over time. After cleaning and inspecting your gear regularly, proper storage and seasonal preparation ensure it stays in great condition for years.
Storage Methods Comparison
Different types of gear require different storage solutions. Here’s how you can store various items effectively:
- Breathable fabric garment bags: Perfect for jackets and textile gear, these bags keep dust out while allowing air to circulate.
- Helmet storage: Always store helmets collar-side down on a flat shelf or rack. Avoid hanging them by the chin strap or visor, as this can damage the internal padding.
- Wide, padded hangers: Use these for heavy jackets to maintain their shoulder shape and avoid material stress.
- Boots: Insert cedar shoe trees to absorb moisture, minimise odours, and preserve the leather structure.
| Method | Advantages | Ideal Use Case |
|---|---|---|
| Breathable fabric bags | Keeps dust out while allowing airflow | Long-term storage for textile gear |
| Cool, dry shelf | Preserves shape and protects from UV | Short-term storage for helmets and hard items |
| Wide, padded hangers | Maintains jacket shape and prevents creases | Off-season storage for heavy jackets |
Seasonal Preparation and Inspection
Before storing your gear for the off-season, make sure it’s clean and dry. Dirt, road grime, salt, and bug residue can stain or damage materials if left untreated. Once cleaned, ensure everything is completely dry to prevent mould growth. For leather items, apply a conditioner or dubbing to keep them supple and crack-free, and reapply waterproofing treatments to textile gear and boots. Cedar blocks or mothballs can help deter insects, but they should not touch your gear directly. If you use Bluetooth motorcycle intercom systems, charge them at least once every three months to maintain battery health. After completing these steps, your gear will be ready to endure the off-season and perform well when riding season returns.
Spring Readiness Check
When it’s time to gear up for a new season, inspect everything thoroughly. Check your helmet for any damage, ensuring fastenings and protective components are intact. Look for wear on boots and secure any loose protective elements. Examine seams on gloves and jackets for fraying or damage. If you notice frayed helmet straps, replace the helmet immediately. A careful inspection ensures your gear is safe and ready for the road.
Conclusion
Taking care of your motorcycle gear isn't just about keeping it looking good - it's about safety, performance, and getting the most out of your investment. Proper maintenance ensures your gear stays reliable on the road, lasts longer, and offers the protection you need.
Simple steps like following care instructions, letting gear air dry naturally, and storing it in a cool, dry spot away from sunlight can prevent problems like UV damage or mildew. Regularly cleaning your visor and checking high-wear areas after each ride can make a huge difference in keeping everything in top shape.
For quality maintenance supplies, check out Moto 1's range. With free shipping on orders over NZ$149 and trusted brands like Shoei, Arai, and RST, you’ll have everything you need to keep your gear ready for the road.
FAQs
How often should I clean each piece of gear?
The cleaning schedule for your gear varies based on the type:
- Jackets: Give them a regular clean, especially after muddy or wet rides. Plan a deep clean every few months or whenever they look noticeably dirty.
- Helmets: Wipe them down after each ride, and do a thorough clean occasionally or after intense use.
- Gloves and boots: Air them out after every ride to prevent odours, and clean them routinely depending on how often they're used.
- Luggage and protective gear: Clean these items whenever they’ve been exposed to dirt or before putting them into storage.
Be sure to stick to the manufacturer’s care instructions for the best results.
When should I replace my motorcycle gear immediately?
If your motorcycle gear is damaged or has been involved in a crash, it’s time to replace it. Helmets, in particular, should be replaced if they show cracks, have been dropped, or have loose padding or frayed straps. For protective items like jackets, gloves, and boots, check for tears, heavy wear, or any signs that they no longer offer adequate protection. Even if there’s no visible damage, a helmet must be replaced after any impact to guarantee your safety.
How do I stop mould and bad smells in storage?
To keep your motorcycle gear fresh and free from mould or unpleasant smells, it's important to clean it thoroughly and make sure it's completely dry before putting it away. Store your gear in a cool, well-ventilated area and skip sealed plastic bags - breathable containers are a much better choice. After every ride, air out your gear to get rid of sweat and moisture. With proper cleaning, drying, and storage, your gear will stay in great condition and smell fresh.