
If I had to keep this simple: wear a certified full-face helmet, abrasion-rated jacket and pants with CE armour, secure gloves, and boots that cover the ankles - every ride.
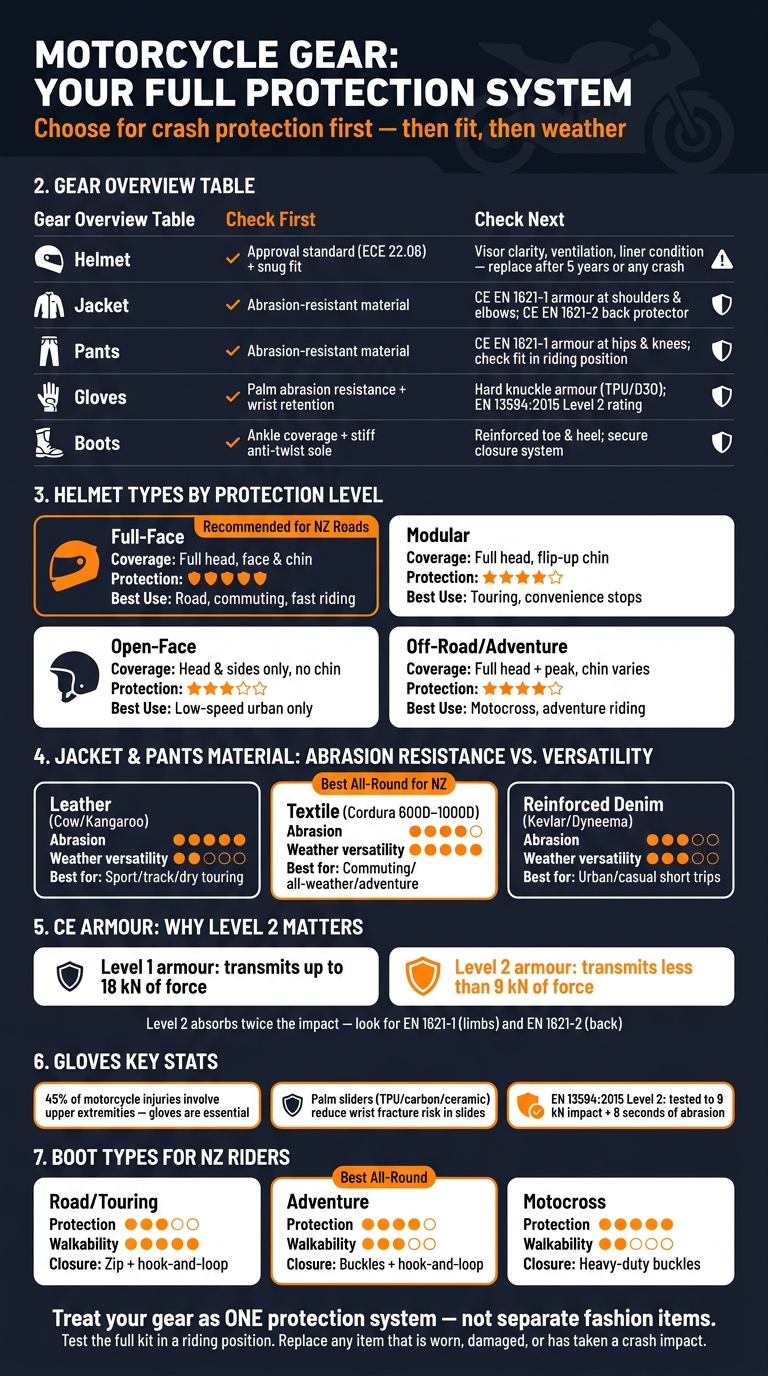
Motorcyclists in New Zealand face far more risk than people in cars. The article’s main point is clear: gear should be chosen for crash protection first, then fit, then weather use. I’d focus on:
- Helmet: approved standard, snug fit, clear visor, replace after a crash or about 5 years
- Jacket and pants: abrasion-resistant material plus CE-rated armour at shoulders, elbows, hips, knees, and back
- Gloves: strong palm material, knuckle protection, and a wrist closure that stops the glove coming off
- Boots: ankle coverage, stiff sole, toe and heel protection, and a secure fastening system
- Whole kit: test it in a riding position and replace worn or damaged items
The article also points out that New Zealand roads and weather matter. Chip seal increases the need for abrasion protection, and mixed conditions mean many riders will want gear that can handle rain, wind, and day-to-day use.
Quick takeaway: I wouldn’t buy gear because it looks good in the shop. I’d buy gear that stays in place, carries the right safety labels, and still protects me when I’m moving, braking, turning, or sliding on the road.
| Gear | What I’d check first | What matters next |
|---|---|---|
| Helmet | Approval and snug fit | Visor, ventilation, liner condition |
| Jacket | Abrasion resistance | Armour position, back protector, adjusters |
| Pants | Abrasion resistance | Knee/hip armour fit in riding position |
| Gloves | Palm strength and wrist retention | Knuckle armour, fingertip fit |
| Boots | Ankle cover and sole stiffness | Toe/heel armour, closure security |
So the short answer is this: pick gear as one protection system, not as separate fashion items. That’s the thread running through the whole piece.
Motorcycle Gear Guide: Protection Levels & Key Safety Checks
You're Doing It Wrong: How-To Buy the Right Motorcycle Gear (2025 version)
sbb-itb-bfda696
How to pick a helmet for the best head protection
Start with two things: certification and fit. If a helmet isn't approved or doesn't sit snugly, it won't do its job well. A helmet deals with the biggest risk first - head impact. It's also the law in New Zealand: every rider and passenger on New Zealand roads must wear an approved helmet.
Helmet types compared by coverage and safety
Use the table below to line up helmet coverage with the kind of riding you do.
| Helmet Type | Coverage | Protection Level | Best For |
|---|---|---|---|
| Full-Face | Full head, face and chin | Highest - best road protection | Road riding, commuting, faster road riding |
| Modular | Full head with flip-up chin bar | High when closed | Touring, riders who want convenience at stops |
| Open-Face | Head and sides only; no chin protection | Lower - significantly less face protection | Low-speed urban riding |
| Off-Road/Adventure | Full head with peak; chin guard varies | High for off-road riding; often worn with goggles | Motocross and adventure riding |
For most New Zealand road riding, a full-face helmet is the safest pick. It gives the most coverage, and that matters when things go wrong. If you spend long days touring and like the ease of a modular helmet, ride with the chin bar fully closed. That's when it gives the highest level of protection.
How to check helmet standards, fit and visor features
Look for ECE 22.06 approval on any helmet you're thinking about.
Fit matters just as much as the sticker on the back. The helmet should feel snug, but it shouldn't create painful pressure points. A good helmet should feel firm and even around your head, not loose in one spot and tight in another. If you notice hot spots after a few minutes, the helmet may be too tight or just the wrong shape for you.
It also helps to look for:
- Adjustable liners
- Removable padding
- Good ventilation
- A clear visor with solid visibility
These features can make a big difference on the road, especially when you're dealing with heat or fogging.
Don't hang onto an old helmet for too long. Replace it after five years, even if it still looks fine. The liner breaks down over time, and that means less protection. If the helmet takes a hit - in a crash or even from being dropped - replace it straight away. Damage inside the helmet isn't always visible.
Once the helmet fits properly, you can move on to the rest of your gear.
Compare helmet styles for your riding at Moto 1
Browse certified full-face and modular helmets at Moto 1, then compare ventilation, visor, and fit features side by side. After that, you can choose jackets, pants, gloves, and boots that match the same level of protection.
How to choose jackets, pants and armour for crash protection
Casual clothes offer almost no crash protection. Motorcycle jackets and pants are built for a different job: an abrasion-resistant outer layer plus armour at key impact zones. Proper motorcycle clothing can reduce soft-tissue injuries and deep wounds in a crash. Once your helmet is sorted, the next areas to cover are the shoulders, elbows, hips and knees.
Leather, textile and reinforced riding jeans compared
Your material choice affects two things straight away: how well the gear holds up in a slide, and how comfortable it feels over a full day on the bike.
| Material | Abrasion Resistance | Weather Versatility | Weight | Typical NZ Use Case |
|---|---|---|---|---|
| Leather (Cow/Kangaroo) | Highest | Low | Heavy | Sport riding, track days, dry road touring |
| Textile (Cordura 600D–1000D) | High | High - waterproof membranes, removable liners | Medium | Commuting, adventure riding, all-weather touring |
| Reinforced Denim (Kevlar/Dyneema) | Moderate - reinforced panels in key zones | Moderate - breathable but limited rain protection | Light | Urban commuting, casual social riding |
For most riders in New Zealand, textile gear is the best all-round pick. It works well for commuting, touring, and mixed weather. Leather suits dry sport riding, while reinforced riding jeans make more sense for short urban trips where you want a more casual look.
How to check CE armour placement and riding-position fit
The outer shell deals with abrasion. The armour deals with impact. You need both.
Look for EN 1621-1 on shoulder, elbow, hip and knee armour, and EN 1621-2 on back protectors. Level 2 armour transmits less than 9 kN of force in standardised drop tests, compared with 18 kN for Level 1. That gap matters.
Fit is just as important as the label. Try gear on in a riding position, not only while standing. Bend your knees and elbows and pay attention to what shifts. Sleeves and cuffs can ride up, and armour can slide away from the joint when that happens. Use the waist, cuff and sleeve adjusters to hold everything where it should be.
Also check the internal armour pockets. They should feel snug, not baggy. If a pocket is loose, the protector can move around in a crash, which cuts down its effect.
A few extra checks are worth doing before you buy:
- Swap thin foam back pads for a standalone CE Level 2 back protector
- Make sure zips and fasteners are covered, because exposed hardware can add injury in a slide
- For airflow, pick garments with vents on the chest or back instead of the elbows or shoulders, where openings can become weak points in a crash
Build a protective riding kit with Moto 1
Browse jackets and pants at Moto 1 for road and adventure riding in New Zealand. Pick gear that matches your protection level, fit and weather needs.
How to choose gloves and boots that protect hands, feet and ankles
Once your body is covered, your hands and feet are next in line. In a crash, they often hit the road early and hard.
What to look for in motorcycle gloves
Upper-extremity injuries make up about 45% of motorcycle injuries, so gloves aren't just a nice extra. They matter. In a slide, the palm is usually the first part to touch down, so start there. Look for abrasion-resistant palms made from full-grain leather (1.2–1.4 mm thick), kangaroo leather, or SuperFabric. Palm sliders made from TPU, carbon fibre, or ceramic help your hand move across the road instead of catching. That can reduce the risk of wrist fractures.
Knuckle protection matters too. Look for hard knuckle armour in TPU, carbon fibre, or D3O. It should sit firmly in place and not shift during a slide.
One detail riders often miss is wrist retention. If a glove comes off in a crash, the rest of its protection doesn't help much. A dual-closure system gives the most secure fit: a wide hook-and-loop strap around the cuff, plus a second strap at the narrow part of the wrist. After you fasten the glove, pull on the fingers. If it slips off, it's too loose.
Fit has a big effect on comfort and control. You want no more than about 6 mm of space beyond your fingertips, and the palm shouldn't bunch when you grip the bars. If the palm bunches up, lever feel drops and control can suffer. For New Zealand's changeable weather, perforated leather or mesh gloves suit summer riding, while waterproof gloves make more sense in winter.
Check inside the glove for the EN 13594:2015 label. Level 2 means the glove has been tested to absorb impact forces up to 9 kN and handle 8 seconds of abrasion - twice the Level 1 threshold.
Road, adventure and motocross boots compared
After your hands, the next weak spots are your ankles and shins, which often take the first hit in a fall.
A proper motorcycle boot should cover the ankle. From there, the main things to check are a stiff anti-twist sole, reinforced toe and heel protection, and a secure closure system.
| Boot Type | Best For | Protection Level | Walkability | Closure System |
|---|---|---|---|---|
| Road/Touring | Street riding, long-distance touring | Moderate - heel, toe, ankle focus | High | Zip + hook-and-loop |
| Adventure | Mixed on-road and off-road riding | High - shin guards, stiffer soles | Medium | Buckles + hook-and-loop |
| Motocross | Dedicated off-road and track use | Maximum - rigid exoskeleton | Low | Heavy-duty multiple buckles |
For most New Zealand road riders, touring or adventure boots are the best middle ground. Motocross boots give the highest level of protection, but they're very stiff, so they're better suited to off-road riding. Also check for CE-rated boots for impact and abrasion protection.
Find the right gloves and boots at Moto 1
You can browse gloves and boots at Moto 1 by riding style and protection level, from summer mesh gloves to CE-rated touring and adventure boots.
How to put your gear together and replace worn items
Once you’ve picked each piece, think of your kit as one system, not a pile of separate items. If you can’t buy everything in one go, start with choosing the right helmet. Then add gloves and a jacket, and after that, boots and riding pants.
Test the full kit in a riding position, not just standing in front of a mirror. Your armour should stay centred on your shoulders, elbows, and knees. Sleeves should still cover your wrists when your arms are stretched out.
Then match the kit to the way you ride most often. For commuting, you’ll want protection that works across different conditions. For touring and adventure riding, weatherproof layers and taller boots make more sense.
Before each season, check the whole kit for wear. Look for:
- frayed stitching
- armour that has moved inside its pockets
- worn-out Velcro
- soles that are starting to separate
Replace any helmet straight after a crash, hard impact, or drop. The internal foam is made for a single impact, and the damage usually won’t show on the outside. As a general rule, retire a helmet after five years even if you haven’t crashed, because the foam liner compresses and breaks down over time.
Buy for protection, fit it in a riding position, and replace it when it’s worn or damaged.
FAQs
What gear should I buy first on a budget?
Start with the basics: helmet first. Then get a jacket with armour, basic gloves, and boots with ankle support.
If you can, choose certified gear that fits you properly. The helmet matters most, then gear that helps protect your body, hands, feet, and ankles without blowing the budget.
How do I know if my armour stays in place while riding?
Choose gear that fits properly and either has armour pockets or comes with armour made for that piece of gear. Before you buy, check that the armour sits in the right place inside the jacket or other riding gear.
It also helps to buy armour from the same manufacturer, because the fit is more likely to line up properly. And if the armour gives you a good balance between flexibility and protection, it’s less likely to move around while you ride.
What gear works best for New Zealand weather?
For New Zealand weather, look for gear with good airflow and ventilation, lightweight materials for comfort on longer rides, and protective clothing that suits changeable conditions.