
When you first get new motorcycle gloves, they often feel stiff and uncomfortable. This can make it harder to grip handlebars, operate controls, and even lead to hand fatigue. Breaking them in is crucial for comfort, control, and safety. Here's a quick guide:
- Choose the Right Fit: Gloves should feel snug but not tight. Too loose or too small gloves won't break in properly.
- Understand the Material: Leather gloves need breaking in, while textile ones are usually flexible out of the box.
-
Break-In Methods:
- Wear them during daily tasks for 2–3 hours a day.
- Use leather conditioner on stiff areas.
- Carefully apply moisture or heat (e.g., steam or a light water soak) to soften leather.
- Ride to Finish the Process: Short rides help mould gloves to your hands.
- Stretch Manually: For stubborn areas, flex your hands or use soft fabric to stretch tight spots.
Avoid drying gloves with direct heat, over-conditioning, or soaking them completely. Proper care, like cleaning and occasional conditioning, will keep them in good shape after breaking in. Well-fitted, broken-in gloves feel like a second skin, making your rides safer and more enjoyable.
Crowdsourced Tips (And Myths) For Breaking-In New Leather Motorcycle Gloves
sbb-itb-bfda696
Know Your Glove Material and Fit
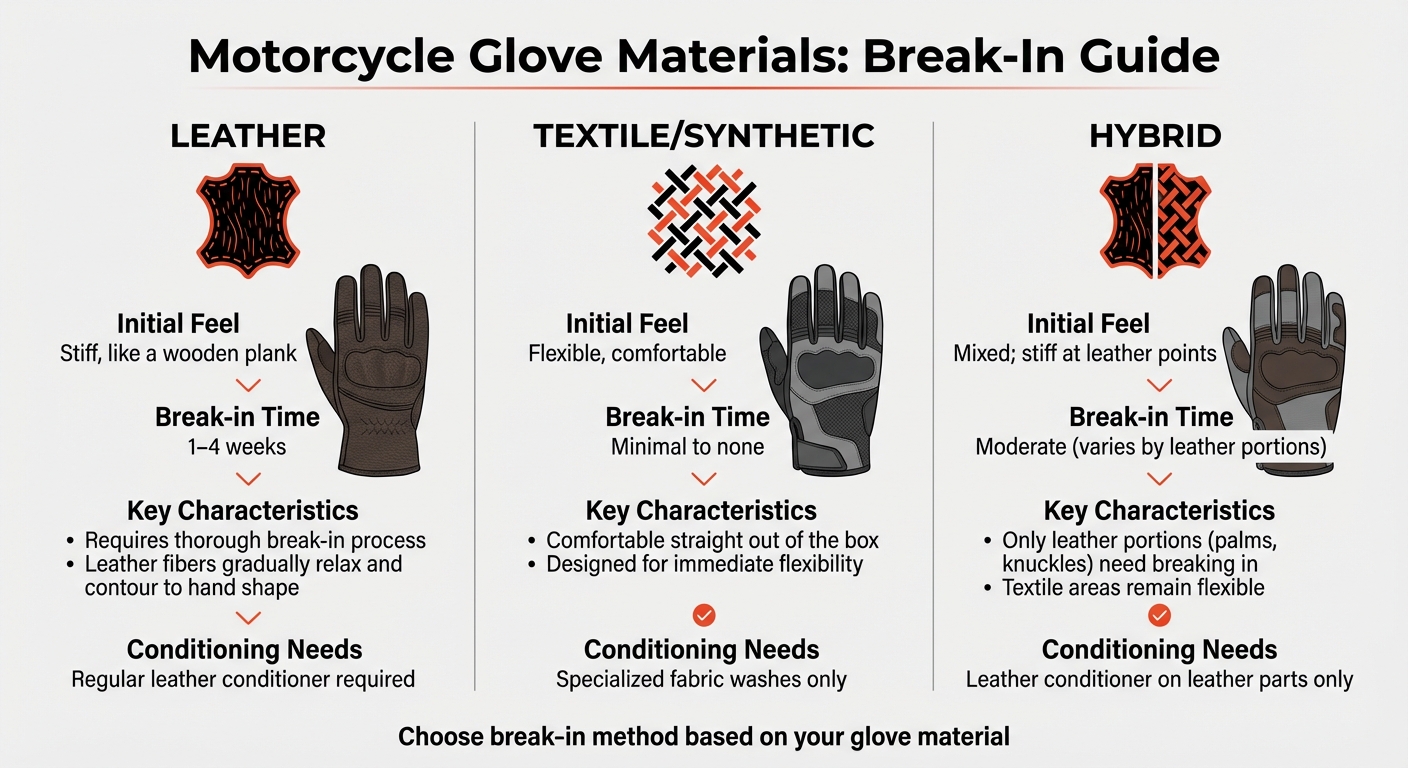
Motorcycle Glove Materials: Break-In Time and Characteristics Comparison
Understanding the material and fit of your gloves is crucial before attempting to break them in. Different materials respond differently to break-in methods, and using the wrong approach could damage your gloves. For instance, leather requires a completely different process compared to textile or synthetic materials.
Check What Material Your Gloves Are Made From
Leather gloves often need a more thorough break-in process. Initially stiff due to the tanning process, the leather fibres gradually relax and contour to your hand's shape with use.
Textile gloves, on the other hand, are usually comfortable straight out of the box. These are designed for immediate flexibility, so they typically don't require breaking in. Cleaning them with specialised fabric washes is often all you need to do.
For synthetic gloves or hybrid models (which combine leather and textile), the break-in process varies. Usually, only the leather portions - like the palms or knuckles - need breaking in, while the textile areas remain flexible from the start.
| Material Type | Initial Feel | Break-in Time |
|---|---|---|
| Leather | Stiff, like a wooden plank | 1–4 weeks |
| Textile/Synthetic | Flexible, comfortable | Minimal to none |
| Hybrid | Mixed; stiff at leather points | Moderate |
Once you're familiar with the material, the next step is ensuring your gloves fit properly to get the most out of them.
Make Sure Your Gloves Fit Correctly
Fit is everything. Even the best break-in methods won't fix gloves that are the wrong size. Gloves should feel snug but not tight. As SA1NT Journal explains:
"Leather motorcycle gloves should never be so tight that you can't comfortably operate the controls and turn signals".
To check the fit, try making a fist while wearing the gloves. If they slip or shift noticeably, they're too loose and might not stay in place during an impact. Your fingers should bend naturally inside the gloves without excessive empty space at the tips. If your hands feel compressed or start aching shortly after putting the gloves on, they're too small and likely won't stretch enough to fit properly.
Before you start any break-in process, make sure your gloves allow for full blood circulation and free movement. Gloves that are more than two sizes too small can't be safely stretched. Also, test your ability to operate all bike controls - brakes, clutch, gears, and turn signals - without the material bunching up or restricting your movements.
A proper fit ensures your gloves feel like a natural extension of your hands, making every ride more comfortable and controlled.
Methods for Breaking In New Gloves
Once you’ve confirmed the fit and familiarised yourself with the material, it’s time to focus on breaking in your gloves. Here are some practical techniques to help you get started.
Wear Your Gloves During Everyday Tasks
One of the simplest ways to break in your gloves is by wearing them during your daily activities. The warmth from your hands naturally softens the leather over time, allowing it to mould to the unique contours of your fingers and palms. While wearing them, make a habit of flexing your hands - clench fists, curl your fingers, and rotate your wrists. These movements help the gloves adapt to the natural grip you’d use while riding or working. If you commit to wearing the gloves for 2–3 hours a day and actively move your hands, you’ll usually notice a difference within 1–2 weeks. However, if you only wear them during rides, the process could stretch out to 2–4 weeks.
Apply Leather Conditioner to Stiff Areas
Leather conditioner is a great way to make particularly stiff areas more flexible. It works by restoring natural oils to the leather, preventing cracks and making the material easier to work with. Focus on applying a small amount of conditioner to areas like the palms, knuckles, and finger joints - these spots tend to be the stiffest. Once applied, flex your hands while wearing the gloves to help the conditioner penetrate deeply. Let the product absorb for several hours or even overnight for the best results. This step is especially helpful for thicker, heavy-duty leather, such as ORINA Carbon Racing Gloves, preparing it for further break-in methods.
Carefully Use Moisture or Heat
For leather that resists softening through regular wear, controlled moisture or heat can be effective - though these methods require extra care to avoid damaging the material.
- Steam Method: Briefly expose your gloves to steam for about 10–15 seconds. Once they’re warm and slightly damp, put them on and flex your hands to stretch the leather. Allow the gloves to dry naturally, away from any direct heat source.
- Water Soak: For especially stiff gloves, try soaking them in warm water for 5–10 minutes until they’re fully saturated. Gently press out excess water without wringing the gloves, then wear them for 30–60 minutes while damp. This helps the leather conform to your hand’s shape.
Important Note: Avoid drying your gloves with high heat sources like radiators, direct sunlight, or clothes dryers. These can cause the leather to shrink, crack, or become brittle. After using moisture or heat, always follow up with a leather conditioner to restore the material’s natural oils, as these methods can strip them away.
Complete the Break-In with Rides and Stretching
Take Short Rides to Finish Moulding
Once you've pre-conditioned your gloves, the next step is to hit the road. Short rides are key to shaping your gloves to your hands. These brief trips - around 15 to 30 minutes - allow the gloves to adapt to your grip and movements in actual riding conditions. The natural motion of using motorcycle controls, combined with the heat and moisture from your hands, helps the leather soften and mould faster. Over time, you can gradually increase the length of your rides as the gloves become more flexible, reducing discomfort and avoiding hand fatigue.
Using your clutch, brake levers, and throttle regularly during these rides ensures the leather stretches in the areas that matter most for control and safety. If your gloves were dampened during conditioning, riding also helps them dry into the perfect shape for your hands. You’ll know the break-in process is complete when the gloves feel like an extension of your skin, allowing you to handle all controls with ease.
"Nothing breaks in gloves like actual riding. Start with short rides so your gloves conform to your grip under real conditions. The natural heat and sweat from your hands will help speed up the process." - eagleleather.com
If you still notice any tight spots after riding, manual stretching can take care of the rest.
Stretch Tight Areas Manually
For spots that remain stiff even after riding, manual stretching is a practical solution. Simple exercises like making tight fists, rolling your fingers, or twisting your wrists can help reduce stiffness. You can also try punching one palm with your other fist or flexing individual fingers repeatedly to target specific areas.
If certain areas, like fingertips or wrists, are particularly stubborn, try stuffing those sections with soft fabric or crumpled newspaper overnight. This provides gentle, consistent pressure to stretch the leather. For an added boost, place a slightly damp towel inside the gloves for 5–6 hours before stretching; the moisture softens the leather, making it easier to shape. Another effective method is to simulate gripping handlebars by practising brake or clutch movements at home, encouraging the leather to mould where needed.
With a combination of riding and these manual techniques, most gloves will feel fully broken in within one to two weeks of regular use.
Care for Your Gloves and Avoid Common Errors
How to Maintain Gloves After Breaking Them In
Once your gloves are broken in, taking care of them properly will help keep their shape and extend their lifespan. After each ride, use a damp cloth to clean off mud, grease, and road debris - these can damage the material over time. A few times a year, wash the inner lining with a mix of diluted soap, vinegar, or saddle soap. This helps remove sweat and salt build-up, preventing odours and keeping the lining fresh.
When conditioning leather gloves, moderation is key. Overusing leather conditioner can weaken the fibres, so apply it sparingly. Be especially cautious with the palms - use less product there to maintain grip. If your gloves get wet, allow them to air dry naturally. Prop them open with a wire hanger to promote airflow, and avoid storing them in enclosed bags, which can trap moisture and lead to mildew. Before they completely dry, briefly put them on and make a fist to set their natural curvature, then let them finish drying in that shape. Always store gloves in a cool, dry place. For casual rides, you might also consider the motorcycle armoured hoodie for a balance of safety and comfort.
"Condition your gloves only a few times a year; too much conditioning will wear down the leather." - Abel Brown
Rotating between multiple pairs is also a smart move. This gives each pair enough time to dry fully between uses. For odour control, try odour-eliminating shoe inserts instead of baking soda - baking soda particles can settle into the leather and are nearly impossible to remove.
Mistakes That Can Damage Your Gloves
Steer clear of direct heat sources like hairdryers, radiators, or sunlight. These can cause the leather to shrink and crack. Machine dryers are even worse - they can ruin the leather fibres and distort the fit. Some people recommend soaking gloves to stretch them, but this weakens the leather and damages the stitching. Stick to cleaning and conditioning products specifically designed for leather, as household chemicals can strip natural oils and cause long-term harm.
Never wring out wet gloves. Instead, gently squeeze water out, starting from the fingertips. Storing gloves while damp or folded can speed up deterioration.
"Don't soak them in water - this weakens the leather fibres and stitching." - Eagle Leather
Avoiding these common mistakes will help you maintain your gloves' quality and ensure they last longer.
Conditioning Methods Compared
The type of conditioning product you use depends on your gloves' material and the conditions you ride in. Here's a quick comparison of common options:
| Method/Product | Best Known For | Pros | Cons |
|---|---|---|---|
| Leather Conditioner | General suppleness | Keeps leather soft, prevents cracks, enhances colour | Overuse can weaken the leather |
| Leather Oil/Grease | Wet weather recovery | Great for gloves exposed to moisture frequently | Can reduce grip if over-applied on the palms |
| Leather Wipes | Convenience | Quick for surface dirt removal and light conditioning | Not effective for deep nourishment |
| Technical Wash | Textile materials | Specially formulated for technical fabrics and linings | Unsuitable for leather portions |
Michael Parrotte, Founder of AGV Sports Group, highlights the benefits of leather conditioner:
"Leather conditioner will not only help you to break in your gloves much more quickly, but it will also protect the leather and make sure that your gloves stand the test of time".
When applying conditioner, focus on areas that flex the most, like knuckles and fingers, while using less on the palms to avoid making them slippery.
Conclusion
Breaking in new motorcycle gloves requires attention to three key steps: understanding the material, using safe break-in methods, and maintaining them properly. Knowing whether your gloves are made of leather, textile, or a mix of both helps you select the right conditioning products and techniques, ensuring you don't damage the fibres or stitching.
Safe break-in practices - like wearing the gloves during daily tasks, using leather conditioner sparingly, and relying on your hand's natural warmth instead of direct heat - can turn stiff gloves into gear that moulds perfectly to your hands. This process typically takes a few weeks. The payoff? A "second skin" fit that boosts both comfort and control.
"Breaking in leather motorcycle gloves isn't just about comfort - it's about control, safety, and endurance on the road." - eagleleather.com
Once your gloves achieve that ideal fit, ongoing care is essential. Regular light cleaning, occasional conditioning, and proper storage keep the leather supple and prevent cracking or brittleness. This not only extends the gloves' lifespan but also preserves their custom fit. Well-maintained gloves mean less hand fatigue on long rides, enhancing both safety and comfort during your journeys.
FAQs
How do I know if my gloves are the right size?
To get the right fit for your motorcycle gloves, they should feel snug but still comfortable, letting your fingers move freely while maintaining a solid grip. Gloves that are too tight can lead to discomfort, while ones that are too loose might compromise your control. A proper fit means no excessive bunching or pinching, and you should be able to make a fist without difficulty. If the gloves feel stiff or your hands slip around inside, they’re likely not the right size.
Can I break in gloves without getting them wet?
Breaking in motorcycle gloves doesn't have to involve water. Instead, try applying a leather conditioner to soften the material - work it in thoroughly to ensure even absorption. Then, simply wear the gloves as much as possible. Flex your fingers, grip objects, or make fists to help the leather adapt to your hand's shape. Sticking to these dry methods will keep your gloves in great condition without the risk of water damage.
What should I do if the palms get slippery after conditioning?
If your motorcycle gloves feel slippery after conditioning, you can fix it with a leather grip restorer. Apply a small amount to the palms and fingers, rub it in gently, and allow it to absorb. This helps improve friction and minimises the slick feeling left behind by conditioning products.